Thursday, October 4, 2007

Fabric Stash Clean Out

Oh my oh my... I have finally done it. I have been cleaning out my apartment over the past month, and today I tackled the fabric stash. I have only been buying fabric obsessively for the past 5 years, and I cannot believe how much I have accumulated!

There is some I never even used, some final scraps of beloved pieces, and everything in between. I have silks, cottons, vintage, upholstery - wow! So I decided to have my first ever fabric sale at my apartment - and I am spreading the word around Austin!

8 Garbage bags full of fabric for sale - and I am not finished cleaning out yet! My goal is to sell as much as possible in one day - wish me luck :)


Fabric Sale

Tuesday, September 25, 2007

Treasure Tuesday: Avon Jewelry

Quite by accident, I have discovered a new love affair with Avon Jewelry. A couple of years ago, I found a fabulous necklace at an Antiques store, and noticed it was signed Avon.


A little research online has revealed that Avon's vintage jewelry is quite collectible - not worth a whole lot $$ wise, but very cool.

Last week, iTaggit released an awesome new feature that allows you to post an item for sale on ebay in a few clicks.


I posted this necklace, on a whim. I had never sold on ebay - can you believe it? I was amazed that someone purchased it! So while I was on ebay, I looked around for pieces I wanted to buy, and found another amazing Avon necklace.

In one week I sold and purchased my first items on ebay - it was very exciting! The new piece is super awesome - 1970s deco style (deco refers to 1920s to 30s style - geometric, urban and angular with a few fancy flourishes). This is all the rage right now in fashion.


Now I have added the new necklace to my Funky Vintage Necklaces collection, and plan on selling and buying a lot more on ebay soon! Check out our online Help section for step by step guides to all the things you can do on iTaggit!

Thursday, August 23, 2007

Thrift Thursday: Antique Quilt Block

One of my favorite pastimes is rummaging through piles of fabric at thrift stores. On occasion, I come up with a real treasure. My mom is an avid quilter, and I absolutely adore quilts - especially old quilts.


I found this hand-pieced quilt block about 2 years ago in one of my favorite vintage stores - New Bohemia in Austin, Texas. I had found two blocks from the same maker months before, and given them to my mom. Then I found this one, and decided to keep it!

Antique Quilt Block

I think the fabric is from the 1930s - but I am not sure. It is very old, and the prints are amazing. I just pinned it to a piece of acid free paper and framed it in a cheapie frame. It hangs in my "textile corner" at the iTaggit offices.

Detail of Antique Quilt Block


One of the things I love about iTaggit is how I can store so much information about each item - multiple pictures, the story of how I bought it, and all kinds of specialized fields depending on the item's category. My mom recently added a collection of her small quilts - check them out! Much more on quilting and quilters to come!

Applique Quilt by my Mom

My iTaggit Profile

Wednesday, August 22, 2007

DIY Wednesday: Jewelry Screen Project!

This Wednesday's project is super easy, and super useful! How many of us gals have piles of earrings laying around - in a drawer or on a dresser, all tangled up? I wanted to make something pretty to hang my earrings on, and this Jewelry Screen is what I came up with!

Difficulty Level: 3 out of 5
Estimated Cost: $20 - assuming you have some of the basics on hand


Materials:

* Frame with a solid back
* Picture Mat that fits frame
* Wire Screen (usually sold as repair item for a screen window or door)
* Foam Core
* Hot Glue Gun & Glue Sticks
* Craft Scissors and X-acto Knife or Rotary Cutter
* Ruler
* Optional: Paint and Brushes to decorate Picture Mat
* Optional: Paper for background


Step One: Preparing the Frame


Take the frame back off and set aside, make sure to attach the hanging wire, if necessary. Discard or reuse the glass for the frame. Now you can decide if you want to paint or decorate the mat - you can buy them in colors, but many frames will come with a plain mat. I chose to paint mine a pretty coral color with acrylic paint - you could decoupage it, stamp it, glue fabric on it - the sky is the limit!

Step One


Step Two: Preparing the Screen


Roll the screen out, and hold it flat with some heavy objects. Place the back of the frame on top, and cut the screen to the same size with your craft scissors. The screen's edges can get sharp, so be careful.

Step Two a

Step Two b


Step Three: Preparing the Foam Core

(get your pet to help!)

You will need 4 pieces of foam core. Use your ruler to measure the width and length of the long side of the mat - cut 2 of this size. Then, lay those two pieces on the mat, and you will have a space left for a top and bottom piece. Measure and cut these 2 pieces. The best way to cut Foam Core is with an X-acto Knife or Rotary Cutter, using a ruler as a straight edge. *The pieces of foam core are more clearly shown in the next photo...

Step Three


Step Four: Assemble the Mat, Screen, and Foam Core


First, plug in the hot glue gun! Lay the mat decorated side down, then lay the screen on top and hold it in place with a heavy object in the middle. Squirt hot glue onto one of the long sides of the mat, and press the foam core on top. Repeat for the other long side, then do the top and the bottom. This will hold the screen in place, and give you necessary space between the screen and the frame back to hang your earrings.

Step Four


Step Five: Finish the Project!


Place the Mat, Screen and Foam Core "unit" face down into your frame. This is where you decide whether you need a background color or pattern. If you do - place it down first, and then put the back of the frame on. Close it all up, and hang it!

Finished Piece

I am new at writing these tutorials - so please send me your feedback! Was this easy to follow? Was my "level rating" on target? Send me pictures if you create one!


My iTaggit Profile

Tuesday, August 21, 2007

Treasure Tuesday: MLK Funeral Fan

So last year my friends and I started going to Round Top, Texas every Fall and Spring for their huge Antiques Fair. It's fields and fields of vendors out in the middle of Texas Farm Land - mostly centered around Round Top, Pop. 77.

MLK Funeral Fan

One of my most unique finds was this promotional fan from the Hemphill Funeral Home of Houston, Texas. Printed in 1967, the fan features a well known photograph of Dr. Martin Luther King, Jr., and one of his most famous quotes. "I have a dream that one day this Nation will rise up and live out the true meaning of its creed: 'We hold these truths to be self evident; that all men are created equal.'"

I pinned it up in my cubicle at work, and look at it every day for inspiration. Recently, I wanted to find out more about the fan, and started researching it using iTaggit's tools. I found out that the tradition of printed fans was very common in African-American Churches during this time, and that it still survives in some places. I just could not find any detailed info about the actual history of this kind of item online. This is a case where I will be better off going to a Library, or better yet, going and interviewing African-American Funeral Home owners in person. Sadly, a lot of this kind of history is taken for granted - like the plastic bread loaves we used to raise money for Church when I was a kid! You see something everyday, and don't think it has any historical value.


I LOVE History, especially African-American History, and now I am impassioned to keep searching for more. I found a few other fans for sale online - ranging from $15 to $215! The value of this fan is personal for me - it was printed in 1967, one year before Dr. King's assasaination, and is from my home State of Texas. I know how hot it gets here - especially in Houston!

What items do you have with an interesting story? Look at your walls and in your closets - surely there is something of value that deserves to be shown off to the world! I am off to research more about these fans!


My iTaggit Profile

Wednesday, August 15, 2007

DIY Wednesday: Painted Pots!

Ok friends - this is my very first attempt at writing a DIY Project blog! I have been crafting for almost all of my 28 years - and I am ready to start sharing some of my fun projects with you.

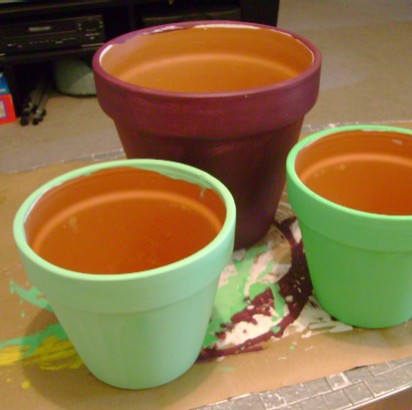
This Spring & Summer have been all about the pots and plants. I decided to start container gardening, and being the crafty gal I am - I just had to have handpainted pots! So here we go on the tutorial:

Supplies:

  • Terra Cotta Pot(s)

  • Acrylic Paints - Basic white for base coat & pretty colors for fun

  • Brushes - Sponge Brushes are easy and cheap

  • Polyurethane for sealing

  • Drop Cloth or Newspaper to protect your work surface

  • Wax paper or something to squirt out your paint on

The Process:


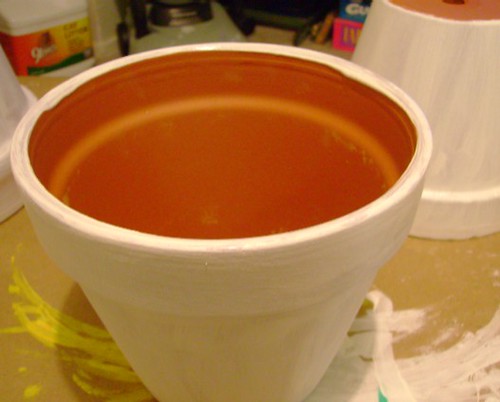
Step One: Start with a clean, dry pot - mine were all new - but it doesn't hurt to rinse them off. Paint the pot with two base coats - I used Acrylic Gesso - but you can use Spray Paint too.


Step Two: Paint the pot a pretty color! Acrylic paints are inexpensive and readily availbe at Craft and Hobby Stores. You can judge if you need one or two coats depending on the quality of paint.


Step Three: Paint designs! I tried to keep things simple and just painted freehand. If you're a beginner, try drawing your designs on the pot with a pencil and then painting over them. A Q-Tip works great for little dots...


Optional: Try Decoupage! Such a fancy word for an easy technique - cut out shapes from Fashion Magazines and glue them on with White Glue or ModgePodge. After many months of rain - my Decoupaged pots aren't holding up as well - but they're still cute!

Step Four: After the paint is all dry - spray the pots with 2 coats of Polyurethane Spray. Do this OUTSIDE and follow the instructions on the product. It helps to coat the inside of the pot too, as terra cotta is very pourous.


Enjoy your Pots! Check out more of my crafts and additional pot pictures in my iTaggit Crafts Collection. I would love to see your crafty projects posted on iTaggit for all to see!


My iTaggit Profile


Thursday, August 9, 2007

Thrift Thursday: Czech Pottery & Texas Traditions

1950s Czech Pottery Bowl


Today I used iTaggit's awesome research feature to find out more about a piece of pottery I purchased last year. It's a funky bowl from the 1950's with a gorgeous linnear design and a pretty glaze. I was able to make out DITMAR URBACH on the mark, and found a website with a history of this pottery online, as well as photos of their marks.

Mark


It's a Czecheslovakian factory that has its origins in the late 1800s, and was two factories combined into one. After going through several ownerships, it was confiscated by the Nazi's in 1938, and then nationalized in 1945. I found this info on the Collector's Circle website.

Matching Czech Vase

I was also able to find a matching piece online! I have contacted the owner of this vase to see about buying it, and used their selling price as a reference in valuing mine.

Now - onto Texas Traditions. For those of you who don't know, Texas has a rich history of immigrants from Eastern Europe. One of the cultural groups that is thriving is that of Czech Descendants. Any Texan can swear by a homemade Kolache - yummy pastries with fruit (or many other) fillings that are sold all over the State.

Kolache Picture

I have fond memories of going to the Texas Folk Life Festival as a kid, eating Kolaches, and going 2-Steppin' at the local SPSJT Hall. In fact, no road trip from Austin to Dallas is complete without a stop in West, Texas - home of the best Kolaches around!


So you see - I was meant to own this piece of Czech Pottery - it's right at home here in Central Texas! Without iTaggit, I never would have learned all this info. One of the things I love so much about collecting is how it can enrich your life!

See my decorations collection here, and check out more of my blog posts here!